For my Communication Design class, aka Art 225, we did a wine branding project. We had to come up with a name for our winery, a winery statement, goals, location...etc. We had to do a series of 3 wines, and have them relate to each other, I chose to do a White Zinfandel, White Riesling and a Blush wine. This was my creative brief for the project:
The diVINO winery is based in the town of Bardolino, which is in Veneto,
Italy. It is one of 20 regions of Italy, its capital and largest city
is Venice. The name of the wine, diVINO, describes it well. Divino is
divine in Italian, and vino is wine, therefore Divine Wine, and its just
that, heavenly, and celestial.
The winery produces sweet wines, mainly aimed towards women. Many women
do not enjoy the taste of a red wine, and their men who like wine want
to be able to drink wine with them. Therefore, producing sweet wines
that women can enjoy, their men will also enjoy having some company. The
age range of the women could appeal to anyone from drinking age and up.
These are not cheap wine, or expensive, they are mid-market wines for
middle class women, who know a good wine when they taste it. We want the
women to feel a sense of a higher, or heavenly class and elegance
while drinking our wine.
The logo of the winery mixes an elegant and contemporary feel with the
cursive and splatter of wine over the O, which is an artistic grape.
Going along with the word of divino, meaning divine, and vino being
wine, the logo is bringing out both of the words within divino.
The three varieties we are designing the packaging for will be a White
Zinfandel, White Riesling, and a Blush wine. The color palette for this
series is going to be directly related to the colors of the wine. The
White Zinfandel’s labels will have a pink and green palette; the White
Riesling will have a yellow and purple palette; and the Blush wine will
have an orange and blue color pallet.
diVINO - Divine wine
It’s Divino
It’s Divine wine
And here is my final project :)
Showing posts with label Photography. Show all posts
Wednesday, March 6, 2013
Thursday, January 31, 2013
Color Photography - Assignment 1
You can go here, to see the photos from my first assignment for my color photography class :)
Thursday, January 10, 2013
Winter 2013 Term
As my second day (now the 4th... been pretty busy this week) of the
Winter 2013 term is ending (starting :) ), I am pretty excited for this
term. Mondays and Wednesdays I have work then 2 classes, Color
Photography and my UNST (University Studies) class. My color photography
teacher is pretty awesome, and already stated that anyone taking 3
studio classes is crazy.... yep that's me though he didn't know he was
talking about me when he said it. My UNST class Knowledge, Values and
Rationality seems like it will be better than my Family Studies class I
took last term. The teacher is an older gentleman, and he is pretty
funny, very animated and goofy... but in a good way. Tuesdays and
Thursdays I have my two design classes, Art 210 in the morning, which is
Illustration, then after that work, and right after work I have my Art
225 class which is Digital Page Design. I definitely will have my work
cut out for me! Its going to be a busy term, but gauging from last term I
decided I wasn't going to work as many hours, which will give me more
time to do some hopefully awesome design work for my classes, which in turn, can
be used in my Portfolio for the Spring. yay..... :)
I will be working out multiple times a week, and definitely want to make time for that. Since I had Mono last term, pretty bad, I thought working out would just kill me even more and make me exhausted. SO, this term I am going to start getting in shape!!
Thursday, November 8, 2012
An Update On Things!
Since school has started I have not been crocheting at all. I have been either too tired on the max, or working on homework. Since I am taking 16 credits and working, when I get time to sit and relax, that is all I do. I really need t get motivated to work on project, because there's so many things I want to make. And then there's some things I NEED to make for Christmas presents. :D which by the way is creeping up too fast on us. School has been super crazy, and I haven't had a lot of time to do anything but school. I really lucked out on the teachers that I got this term. From seeing what other friends have been doing in their classes, I think the work load would have been so overwhelming if I had their teachers. I thank God that he made it happen this way.
ALSO.....
I looked at what I need and want to take next term, winter 2013!!! And it comes up to 16 credits and going to reduce my hours of work, so that I can have more time to do homework. Next term, I am hoping to get into Color Photography! I think that would be so great! So be praying that I get it. I got the last spot in B&W film photography, and that was a close one!
*NEWS*
If you haven't already seen, I started my own business. I have been working on getting another blog page up for that. I will hopefully have that up soon, and have all my information there and available. This is very exciting for me, and would love as much support as I can get. I would greatly appreciate it!
ALSO.....
I looked at what I need and want to take next term, winter 2013!!! And it comes up to 16 credits and going to reduce my hours of work, so that I can have more time to do homework. Next term, I am hoping to get into Color Photography! I think that would be so great! So be praying that I get it. I got the last spot in B&W film photography, and that was a close one!
*NEWS*
If you haven't already seen, I started my own business. I have been working on getting another blog page up for that. I will hopefully have that up soon, and have all my information there and available. This is very exciting for me, and would love as much support as I can get. I would greatly appreciate it!
Tuesday, October 23, 2012
Narrative - GIF Project
In my Narrative and Communication Design class we were assigned to create a GIF, about how to do something. The assignment was : "What can you teach someone in 15 frames? We'll be exploring basic motion principles through simple animation where you will teach all of us how to do something. Besides learning about motion we'll hopefully be learning new skills and more about each other." So I decided to do one on how to make a lyric plate. I make these plates with bible verses and lyrics on them. I thought it would be a good easy tutorial. These are the photos I used to create my GIF:
And here is my final GIF :)
Thursday, October 11, 2012
B&W Photography - Prints
1. First you need to pick the picture you want to print. Then take that negative and line it up in the negative holder emulsion side down (idk what the official name is) in the head of the enlarger, use Dust Off and spray it with the air, to get dust off. And place it back in the enlarger, and secure it (lifts up and down with turning a knob or lever)
2. Turn the white light off , and after the negative is all set, you put the easel with just a plain white piece of paper in it under the enlarger. This way you can fit the image to the paper, by lifting the head up and down. Then focusing it by look, then using a looking magnifying glass thing (idk what it is) you look through it and make sure the texture you see is like sand paper. (details)
3. Have the timer set at 3 seconds. Then get your paper out, and place it in the easel. The shiny side of the RC Paper is the emulsion side, this should be up.
4. Again, we do a test sheet to find the exposure time that is best (this can be on strips or little squares to conserve paper). The lens is at a 5.6 or 8 fstop to start with. And start with a 2-3.5 contrast filter. The filter ranges from 00-5. 00 being the least contrast in black and white, and 5 being the most. To do the test sheet we cover all but one strip of the paper, expose it for 3 seconds and move to the next. This will give us a sheet to compare exposures with.
5. Just like for the RC Contact sheets, we have to develop the RC Paper. In the dark room there is a large (long) sink that holds 4 tubs. The first one is Developer (that is already mixed for us), the second is Acid Stop Bath, the third is the Fix, and fourth is the wash (running cool water). These all have about a half inch of each liquid.
6. For the RC paper you place the exposed sheet in the Developer tub, and agitate for 2 minutes. We do this by lifting the corners so the developer flows over the sheet constantly.
7. When the 2 minutes are up, you take wood tongs with rubber ends and lift the sheet out and let it drip. and place it in the Acid Stop Bath for 30 seconds.
8. Again, lift the sheet out with a separate pair of tongs, let it drip and place it in the Fix tub for 3 minutes, and agitate. At this point, if you were alone you could turn on a white light and look at it, but since we do this with lots of people we have to go out of the room to see which exposure is right.
9. After the 3 minutes, lift with yet another pair of tongs and place in the wash for 15 minutes. When it's done being washed (with test ones we just rinse them for 30 seconds) you can go out into white light and pick the exposure that is best.
10. When you have picked which exposure is right. ( increments of 5 seconds, 5, 10, 15....) You may have to change the exposure/ fstop/ filter, but after doing a couple test sheets you should be able to pick one. Then you make a final one with the exposure you picked, following the same steps again :)
![]() |
| This is my first final print I made :) It does have some glare from the lights in the hall, and it was still wet. :P |
| First test sheet ^ |
| Ended up too dark |
| Another test sheet |
| And yet another :P |
B&W Photography - RC Contact Sheets
Once we did that we were all set to make RC Contact Sheets. For that we use Ilford RC pearl paper. It is light sensitive, you can't expose it to any white light unless you're making a pring, only red or amber. In the darkroom at PSU we have an amber safe-light in the main area, and 2 red lights in the smaller rooms for developing film.
When using the enlarger to make RC Contact Sheets, all you have to do is adjust the height, and fine focus. You only need the white light to make the negatives positive.
1. First have your Contact sheet ready, and place it below the enlarger and frame it in the light projecting down from the enlarger.
2. Fine focus so the light surrounding the sheet is a hard line, not fuzzy.
3.Turn the light off, and have the timer set at 5 seconds. Then your paper out, and place it under the contact sheet. The shiny side of the RC Paper is the emulsion side, this should be up. Also, the film should be placed so that the emulsion side is also down, both emulsion should be facing each other. We also place a piece of plexiglass or glass over the 2 sheets to press the film down (it curls).
4. We do a test sheet to find the exposure time that is best. The lens is at a 5.6 or 8 fstop. To do the test sheet we cover all but one strip on the contact sheet, expose it for 5 seconds and move to the next. this will give us a sheet to compare exposures with. The sprokets of the film should be barely visable on the RC Paper when its developed. But I'm getting ahead of myself.
5. Now we have to develop the RC Paper. In the dark room there is a large (long) sink that holds 4 tubs. The first one is Developer (that is already mixed for us), the second is Acid Stop Bath, the third is the Fix, and fourth is the wash (running cool water). These all have about a half inch of each liquid.
6. For the RC paper you place the exposed sheet in the Developer tub, and agitate for 2 minutes. We do this by lifting the corners so the developer flows over the sheet constantly.
7. When the 2 minutes are up, you take wood tongs with rubber ends and lift the sheet out and let it drip. and place it in the Acid Stop Bath for 30 seconds.
8. Again, lift the sheet out with a separate pair of tongs, let it drip and place it in the Fix tub for 3 minutes, and agitate. At this point, if you were alone you could turn on a white light and look at it, but since we do this with lots of people we have to go out of the room to see which exposure is right.
9. After the 3 minutes, lift with yet another pair of tongs and place in the wash for 15 minutes. When it's done being washed (with test ones we just rinse them for 30 seconds) you can go out into white light and pick the exposure that is best.
10. When you have picked which exposure is right. ( increments of 5 seconds, 5, 10, 15....) The one that you can barely see the sprocket holes of the film on. Then you make a final one with the exposure you picked, following the same steps again :)
This is what my Final Contact Sheet looks like :) (sorry if it's blurry I took the picture with my phone)
Labels:
BW Photography,
Darkroom,
Film,
Photography,
PSU,
School
Wednesday, October 10, 2012
B&W Photography - Darkroom!
Earlier this week, more specifically Tuesday (the 2nd), I had my first darkroom experience. We had to have taken 2 rolls of pictures over the weekend, and have the film in hand in class on Tuesday morning. During class we developed one of the roll of negatives! The process was pretty tedious, and I was glad I found a partner to do it with the first time, or else.....it probably would have gotten messed up!
SO...this is what we had to do (for people that don't know the process behind it)....
4. Turn out the lights (no light anywhere)
5. Open the film canister with the bottle opener (fromt he flat side, and push the knob up to get the film out), and cut the L shape off the roll of film with the sissors.
6. Feed the film onto the reel and twist sides of the reel to wind the film in it.
7. Once its fed all the way through, cut/tear the tape off the end, and stick the reel onto the stem in the canister, we had partners so there were 2 reels of film in it.
8. Put the funnel lid on the canister, and twist it on till it locks. And put the flexible lid on.
9. Now the lights can go back on.
10. We then took off the lid and poured the developer and water in the canister and agitated (turn the canister over, and back) for the first 30 seconds. Then repeat the agitation every min for 10 seconds for 10 minutes.
11. Then comes the Water Stop Bath. We had to fill and dump the canister 3-4 times with cool water.
12. After that, we fixed the film. This takes 5 minutes doing the same agitation for 10 seconds every minute for 5 minutes.
13. After the film is fixed you pour the fix back in the jug, because it contains silver, and that cannot be put down the drain.
14. After pouring it back into the jug, you wash the film again, but this time, fill and dump 10 times with cool water.
15.When it is thoroughly washed, we removed the fix, with fix remover/ permawash. This we agitated for 2 minutes straight.
16. After the 2 minutes of agitation, we set in a bin with cool running water for 10 minutes.
17. Once it was washed for 10 minutes in the running water, we had to put it in this stuff called photoflo for 30 seconds. It keeps the film from fogging up.
18. THEN, after taking the film off the reel, our dark room has a film dryer, and you leave it in there for 20 min or until its dry. You can tell if its dry by the film curling towards the emulsion side.
SO...this is what we had to do (for people that don't know the process behind it)....
- First we prepared the chemistry...1:9 of 2 oz of developer and 18 oz of 68* water and combine them. Also we prepared 20ish oz of 68* water.
- Then we collected the supplies we would need:
- bottle opener
- sissors
- roll of film
- plastic (or metal) canister
- A stem for the canister
- Plastic reel
- Funnel (light safe) lid for the canister
- flexible lid for the canister
4. Turn out the lights (no light anywhere)
5. Open the film canister with the bottle opener (fromt he flat side, and push the knob up to get the film out), and cut the L shape off the roll of film with the sissors.
6. Feed the film onto the reel and twist sides of the reel to wind the film in it.
7. Once its fed all the way through, cut/tear the tape off the end, and stick the reel onto the stem in the canister, we had partners so there were 2 reels of film in it.
8. Put the funnel lid on the canister, and twist it on till it locks. And put the flexible lid on.
9. Now the lights can go back on.
10. We then took off the lid and poured the developer and water in the canister and agitated (turn the canister over, and back) for the first 30 seconds. Then repeat the agitation every min for 10 seconds for 10 minutes.
11. Then comes the Water Stop Bath. We had to fill and dump the canister 3-4 times with cool water.
12. After that, we fixed the film. This takes 5 minutes doing the same agitation for 10 seconds every minute for 5 minutes.
13. After the film is fixed you pour the fix back in the jug, because it contains silver, and that cannot be put down the drain.
14. After pouring it back into the jug, you wash the film again, but this time, fill and dump 10 times with cool water.
15.When it is thoroughly washed, we removed the fix, with fix remover/ permawash. This we agitated for 2 minutes straight.
16. After the 2 minutes of agitation, we set in a bin with cool running water for 10 minutes.
17. Once it was washed for 10 minutes in the running water, we had to put it in this stuff called photoflo for 30 seconds. It keeps the film from fogging up.
18. THEN, after taking the film off the reel, our dark room has a film dryer, and you leave it in there for 20 min or until its dry. You can tell if its dry by the film curling towards the emulsion side.
And there you go! The next step is contact sheets and printing. but that'll be another post :)
Friday, October 5, 2012
Narrative & Communication Design - Project 1 - Moodboard
This fall I am taking Art 224.... aka Narrative & Communication Design. For our first project we are supposed to create a moodboard about ourselves. I choose to focus on the Photography side of me. While doing this project I went through all my photographs I've taken, and was able to kind of pin point when I started. I think it all started back in 2008 when my family went to Disney World. BUT.... more on that later, back to the moodboard! Starting on this project I changed directions many times....and here is my process!!
I started out with the idea to use my pictures to describe me, and what I like to do. I also thought maybe I should label them! As shown in picture below.....
Then, since i wasn't able to fit every picture I wanted to on there with the labels, I decided to take the labels and borders off.....
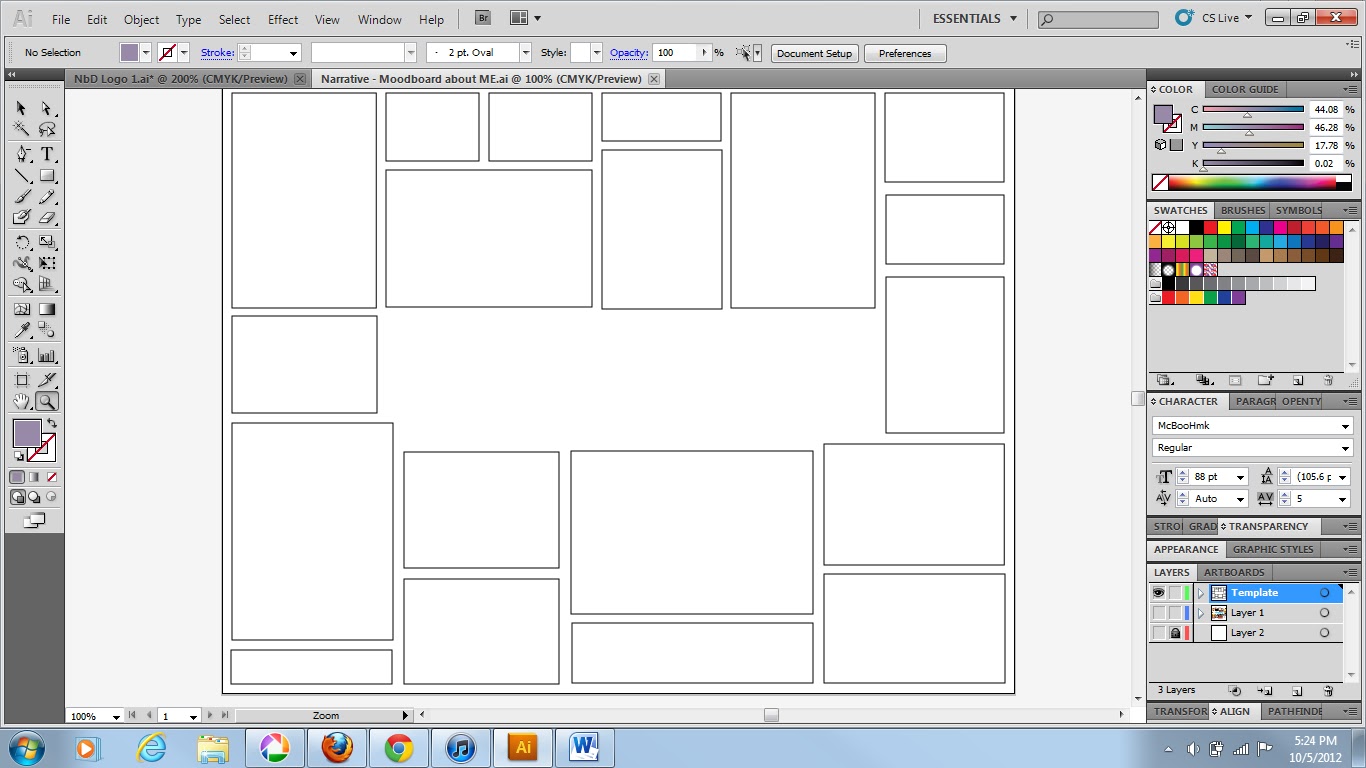
That worked a lot better, I think looked more like a moodboard, and was not so cluttered. But, if you noticed, there were lots of awkward shapes that weren't filled. That posed a problem, because it looked incomplete. So, I came up with the idea of filling those shapes in with squares and rectangles of color. I matched the color to my logo for my photography that I included in my moodboard.
When we did critiques in class though, my teacher suggested that I take color samples from the pictures on the moodboard instead. I tried it, and to my surprise it worked a lot better, and looked warmer, and not so uniform.
I noticed that the purple square on the top left was on the same side as the purple rectangle on the bottom left. I wasn't too thrilled with how it looked, so I switched the colors of the top middle rectangle with the purple square on the top left. That worked a lot better in my opinion.
Now, since my teacher had suggested I include photographs that I like, and not just my photography, I created a template from the above moodboard. That way, I can make 2, one of inspiration and one of my photography. I did like the idea of representing me and who I am through my work, but he wants something a little different, so... I'll just make 2!)
Tuesday, September 25, 2012
Fall Term 2012
Woah, today was my third day of Fall term 2012 at Portland State University. I am getting a little overwhelmed already; I am taking 16 credits, working about 17 hours a week at school, and have Mono! Whoo! But, seriously, I can say I am definitely feeling the effects of Mono, and have been really tired.
I can tell this year will be really fun. I am taking 4 classes, 3 of them are art classes. These include: Typography I, Narrative and Communication Design, Black and White Photography, and Family Studies. I am glad to have friends in 2 of the 4 classes, or at least people I know. It's still fun to meet new people, just its not as important in the 2 that I know people in. So far, I'm managing my time well, and am getting things done ahead of time, rather than last minute, which I think will be essential. Google calendars is going to play a big part in my organization.
On another note, I am excited to be participating in the Color Run on Saturday! If you don't know what it is check out this link. I am going to pick up my packet on Friday.... tomorrow, so will definitely document that :P It's going to be a lot of fun! I am glad a couple of my friends are doing it with me. Because I have mono, I will be taking it kind of easy, and doing my best, which may not be running, or jogging for that matter. Just depends on how I'm feeling.
ALSO, I have a semi finished logo for my photography; now I just need to get a Doing Business As, and I will be set.
I am hoping this year to be posting about projects I am doing, and how my Sophomore year at PSU is going :) So, Stay Tuned!
I can tell this year will be really fun. I am taking 4 classes, 3 of them are art classes. These include: Typography I, Narrative and Communication Design, Black and White Photography, and Family Studies. I am glad to have friends in 2 of the 4 classes, or at least people I know. It's still fun to meet new people, just its not as important in the 2 that I know people in. So far, I'm managing my time well, and am getting things done ahead of time, rather than last minute, which I think will be essential. Google calendars is going to play a big part in my organization.
On another note, I am excited to be participating in the Color Run on Saturday! If you don't know what it is check out this link. I am going to pick up my packet on Friday.... tomorrow, so will definitely document that :P It's going to be a lot of fun! I am glad a couple of my friends are doing it with me. Because I have mono, I will be taking it kind of easy, and doing my best, which may not be running, or jogging for that matter. Just depends on how I'm feeling.
ALSO, I have a semi finished logo for my photography; now I just need to get a Doing Business As, and I will be set.
I am hoping this year to be posting about projects I am doing, and how my Sophomore year at PSU is going :) So, Stay Tuned!
Labels:
Class,
Color Run,
Design,
Graphic Design,
Mono,
Photography,
PSU
Friday, July 6, 2012
4th of July Fireworks!
This year for the first time my parents did not buy fireworks. But, I did get the chance to see a show in Corbett. This was my second time shooting fireworks, and a bunch of them came out great :) Fireworks are just soooooo pretty! I don't have a lot to say about it, but it was awesome we were so close, and they were great. I'll let you get to looking at the pictures now ;) This is only a few of the ones I took, I have a lot more, just haven't gone through them yet.
![]() |
| This is one of my FAVORITE pictures I've taken :) |
![]() |
| People... always in the way haha |
Subscribe to:
Posts (Atom)